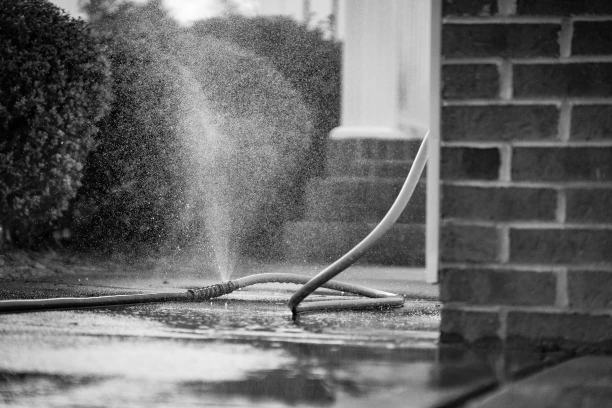
If you’ve ever turned on your hose and noticed water spraying everywhere except where you want it, you’re not alone. I’ve helped plenty of homeowners deal with leaking garden hoses over the years, and most of the time, the fix is simpler than people expect.
A leaking hose is annoying, wastes water, and can slowly drive up your water bill. Worse, many people toss the hose and buy a new one when the real problem could be fixed in just a few minutes. Before you do that, it’s worth understanding why hoses leak in the first place and how to fix them properly.
In this guide, I’ll walk you through the real causes of a leaking garden hose and show you step by step how to fix it, based on what actually works in real backyards.
Why Garden Hoses Start Leaking
A garden hose doesn’t usually fail all at once. Leaks almost always start small and get worse over time. From my experience, hose leaks usually come from one of four areas.
Worn or Damaged Hose Ends
The most common leak happens right at the end of the hose, where it connects to the spigot or spray nozzle. This area sees the most stress from twisting, pulling, and tightening.
Common causes include:
- Cracked or hardened rubber washers
- Stripped threads
- Loose or damaged couplings
Small Cracks or Pinhole Leaks in the Hose
Hoses dragged across concrete, gravel, or around sharp corners can develop tiny cracks. Leaving a hose pressurized in the sun also weakens the material over time.
These leaks often show up as:
- Fine sprays or misting
- Small wet spots along the hose length
Split or Bulging Sections
If a hose has been left full of water during freezing weather or constantly under high pressure, the inner lining can fail. This causes bulges that eventually split open.
Once this happens, the hose usually leaks badly when water is turned on.
Leaks at the Spigot Connection
Sometimes the hose isn’t the real problem. The leak may come from:
- A missing washer in the hose fitting
- A loose connection at the outdoor faucet
Cross-threading when the hose was attached
Start by Finding the Exact Leak
Before fixing anything, you need to know where the water is coming from.
Here’s what I recommend:
- Lay the hose out straight on the ground.
- Turn the water on slowly.
- Walk the length of the hose and watch closely.
- Check both ends and the middle sections.
Once you know where the leak is, the repair becomes much easier.
How to Fix a Leaking Garden Hose (Step by Step)
Fixing Leaks at the Hose End
This is the most common and easiest repair.
Step 1: Check the Washer
Inside the female end of the hose is a small rubber washer. If it’s cracked, flattened, or missing, the hose will leak.
What to do:
- Remove the old washer with a small screwdriver
- Replace it with a new rubber washer of the same size
- Reattach the hose and tighten by hand
In many cases, this alone stops the leak completely.
Step 2: Replace a Damaged Hose End
If the washer is fine but water still leaks, the metal or plastic hose end may be damaged.
How to fix it:
- Cut off the damaged end of the hose with a sharp utility knife
- Install a replacement hose repair fitting (available at any hardware store)
- Tighten the clamp securely
I’ve saved many “dead” hoses this way for just a few dollars.
Fixing Small Holes or Cracks in the Hose
If the leak is along the length of the hose, you have a couple of options.
Option 1: Hose Repair Tape
This works well for small pinhole leaks.
Steps:
- Dry the hose completely
- Wrap hose repair tape tightly around the leak
- Overlap the tape by at least an inch on each side
This is a quick fix, but it may not last forever, especially under high pressure.
Option 2: Cut and Repair the Section
For a more durable fix:
- Cut out the damaged section of hose
- Use a hose mender to reconnect the two ends
- Tighten the clamps securely
This method usually lasts much longer than tape.
Fixing Bulging or Split Sections
If the hose has a visible bulge or a large split, tape won’t hold.
What works:
- Cut out the damaged section completely
- Install a hose mender or coupler
- Test for leaks before using normally
If the hose has multiple bulges or feels weak in several places, replacement is often the better option.
Fixing Leaks at the Spigot Connection
If water sprays from where the hose connects to the faucet:
- Make sure a rubber washer is installed
- Hand-tighten the hose firmly (don’t use pliers)
- Check that the threads are not cross-threaded
- Inspect the faucet for damage
Sometimes replacing the washer is all it takes.
Extra Expert Tips That Prevent Future Leaks
Over the years, I’ve noticed that most hose leaks are preventable. These small habits make a big difference.
- Turn off the water at the spigot when the hose isn’t in use
- Relieve pressure by squeezing the nozzle after shutting off water
- Don’t drag hoses across rough surfaces
- Use hose guides around sharp corners
- Disconnect and drain hoses before winter
- Store hoses out of direct sunlight when possible
These steps extend the life of any garden hose.
Common Mistakes Homeowners Make
Here are mistakes I see all the time that shorten hose life:
- Overtightening hose connections
- Leaving hoses pressurized all day
- Ignoring small leaks until they grow
- Using cheap washers that don’t seal properly
- Leaving hoses outside during freezing weather
Fixing these habits often prevents leaks from coming back.
When to Repair and When to Replace
Sometimes repairing a hose just isn’t worth it.
Repair if:
- The leak is near the end
- There’s only one small damaged section
- The hose material still feels flexible
Replace if:
- There are multiple leaks
- The hose has several bulges
- The inner lining feels brittle
- Repairs keep failing
A good-quality hose costs more upfront but usually saves money over time.
Final Thoughts From Experience
A leaking garden hose doesn’t automatically mean it’s time to buy a new one. In many cases, a simple washer replacement or hose repair fitting solves the problem quickly and cheaply.
From years of hands-on experience, I can say this: the sooner you fix a small leak, the easier and more permanent the repair will be. Take a few minutes to diagnose the issue, use the right fix for the problem, and your hose will be back to working the way it should.
Most homeowners are surprised by how easy hose repairs really are once they understand what’s going wrong.